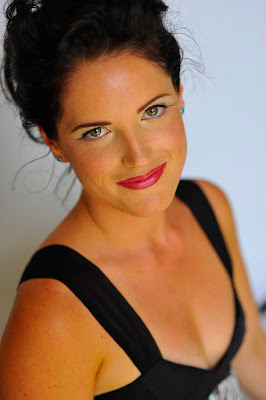
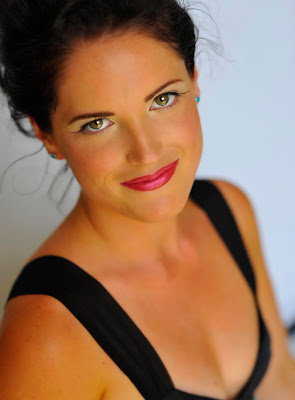
One of the great challenges for portrait, glamour and and wedding photographers ( among others ) is facial retouching. Where do you start, and at what point do you stop?
Some of the magazine covers we see show images of faces that are beautifully retouched. Some are ridiculous, impossible.
The art of retouching has been around since the inception of photography. Before that, painters made sure to blur the lines between reality and complimentary. In these portraits of Belinda, a rather beautiful bridesmaid who hated having her photo taken, I have used a few techniques that I believe were complimentary without taking away or distracting from the reality of her near perfect features.
The first image is from the camera, untouched, uncropped. I shot this image with my Nikon D700 and my Nikkor 85mm lens.

The second image has been retouched in PhotoShop.

First of all, I cropped the image slightly.
Then, I removed some small blemishes using the heal tool.
Then, using a soft paintbrush with an opacity and flow of about 15 each, I softly painted over the hot spots on her forehead and nose with a sample of colour taken from her skin.
Then, using the burn tool, I whitened her eyes a little.
Then, back to the paintbrush. Using white, I softly painted over the catchlights in her eyes to highlight them a little more.
Finally, I made a duplicate layer and applied Surface Blur to her face. Surface Blur retains sharpness in the edges. It does not create the haloed effect of Gaussian Blur. I set my Surface Blur settings to about 15 for radius and 15 for Threshold. Then I changed the opacity settings between the top layer which had the Surface Blur effect and the sharp layer beneath to about 66 percent.
Flatten and Save.
What are your thoughts? Too much, or too little?
3 comments:
That looks a neat, simple way to tidy up a portrait. Although I dont use any form of blur on portraits anymore, I would suggest the careful application of it to the skin only leaving the eyes and hair as well as any clothing and jewellery un blurred. The hair especially is noticeably soft in the finished version. It is certainly something that most people with very basic photoshop skills can do to improve their portraits. I now use adjustment layers to dodge and burn when evening out skin tones and soften skin up for a more natural look.
Adam Zappia
I think it is a great job... I have been a lot of work in PS (CS4) lately. I know that using a copied layer (CTRL + J) and then cloned the areas where there is some shine to the forehead, etc. On the new layer, I changed the Opacity to 60% (roughly) with normal blending mode to remove the shine. Finally, I flattened that image. It works nicely, too. I only mention this because there is a very small shine on her forehead, but you want that, as too flat of an image may look boring. :-)
Thanks for your comments guys. Much appreciated.
Adam, the hair is soft in both versions because of depth of field, which is due to the 85mm Nikkor being used at f1.8.
Post a Comment